Webhook Documentation
This document explains the steps to set up a webhook with myDSV and highlights recent updates for enhanced functionality.
A webhook is a reverse API that proactively sends notifications to the provided endpoint. The myDSV Webhook will not send sensitive data. To retrieve the actual shipment data, the Tracking API must be used.

Webhook - Notification.
The webhook tracking message has been expanded to include the full tracking dataset (existing Tracking message) and change tracking. The following updates have been implemented:
Full Dataset Inclusion: The webhook now includes a complete tracking dataset in the response, including shipment details, events, and package information.
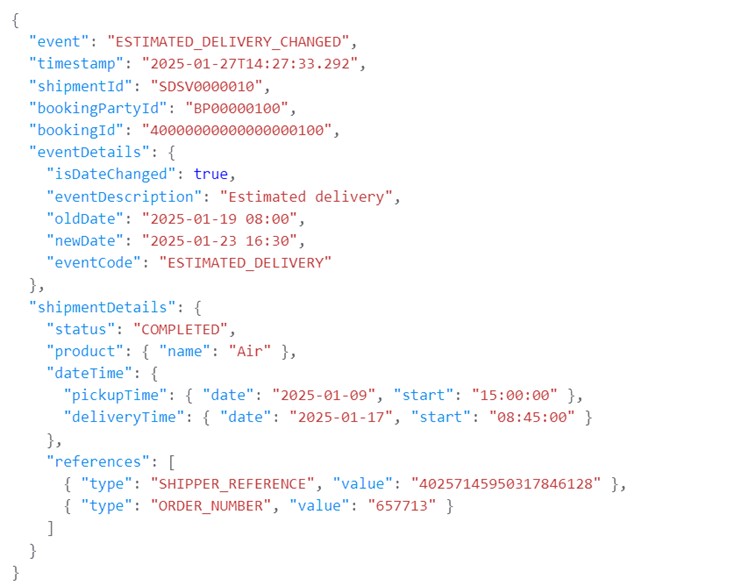
Change Tracking: For certain fields (e.g., event dates), the webhook message will indicate the old value and the new value. Example:

Enhanced Event Details: Additional fields such as eventCode and eventDescription have been added to event messages. More information about these new fields can be found in the Webhook documentation.
Webhook Notification: Before vs. After
To better understand the changes, here's a comparison between the previous and updated payload structures:
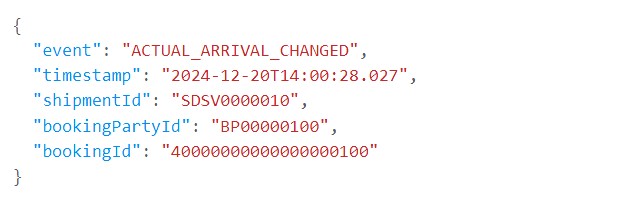
Before:
After:
Key Improvements:
Added eventDetails to track changes (e.g., old and new dates).
New fields: eventCode, eventDescription, and detailed shipmentDetails.
More comprehensive data to simplify tracking and improve notification accuracy.
Payload structure
The payload structure of the webhook includes:
Event(see event codes in the Notification Subscription Options section)Timestamp(when the webhook was triggered)Shipment IDBooking IDBooking Party IDEvent Details:
eventDescription(describes the type of event)eventCode(identifies the event)isDateChanged,isDateCancelled,isNewDateoldDate,newDate(if applicable)
Shipment Details:
Status, Product, Dates, References, Parties, Packages, Transport
Response
DSV expects an HTTP 200 response code from your endpoint. Ensure proper error handling to confirm successful receipt of webhook notifications.
Setting up a webhook
The webhooks can be created in myDSV with the following steps:
1. Email DSV at developer.support@dsv.com to enable Webhook feature
2. Login using your API credentials at https://mydsv.com/new/settings/subscriptions
3. After login you will see the below screen:
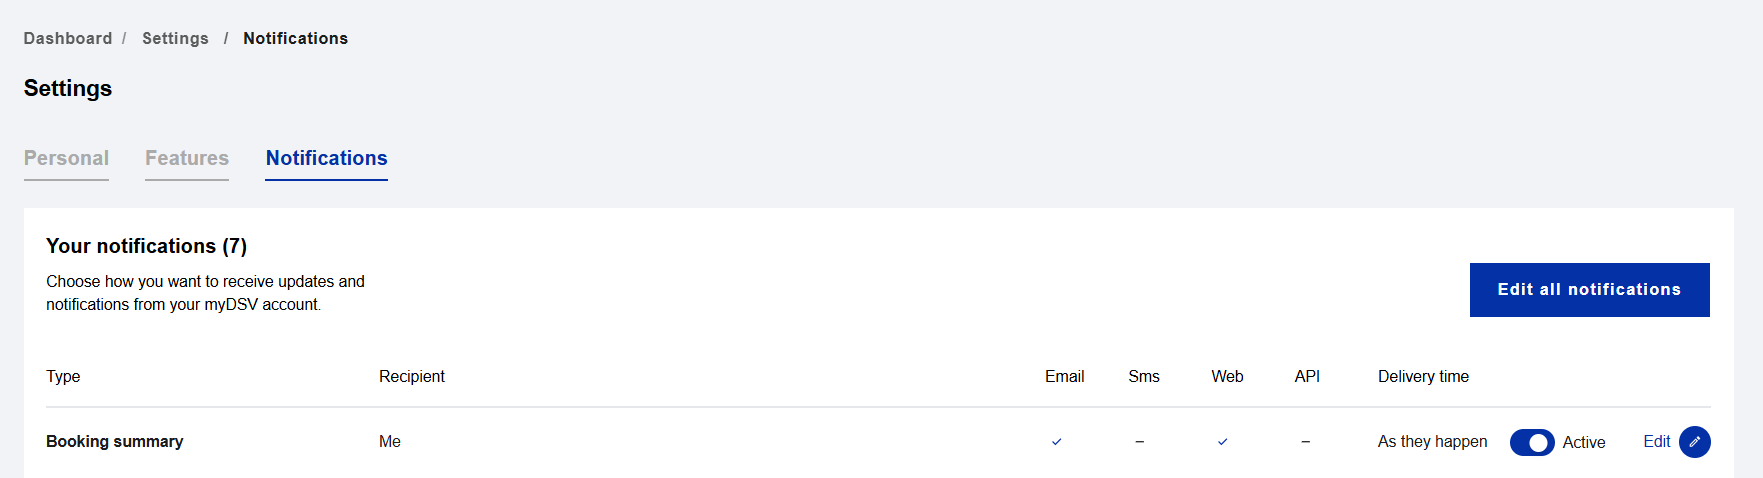
4. Click “edit all notifications” or click on “add subscription”.
*DSV expects to receive an HTTP 200 response code from your endpoint.
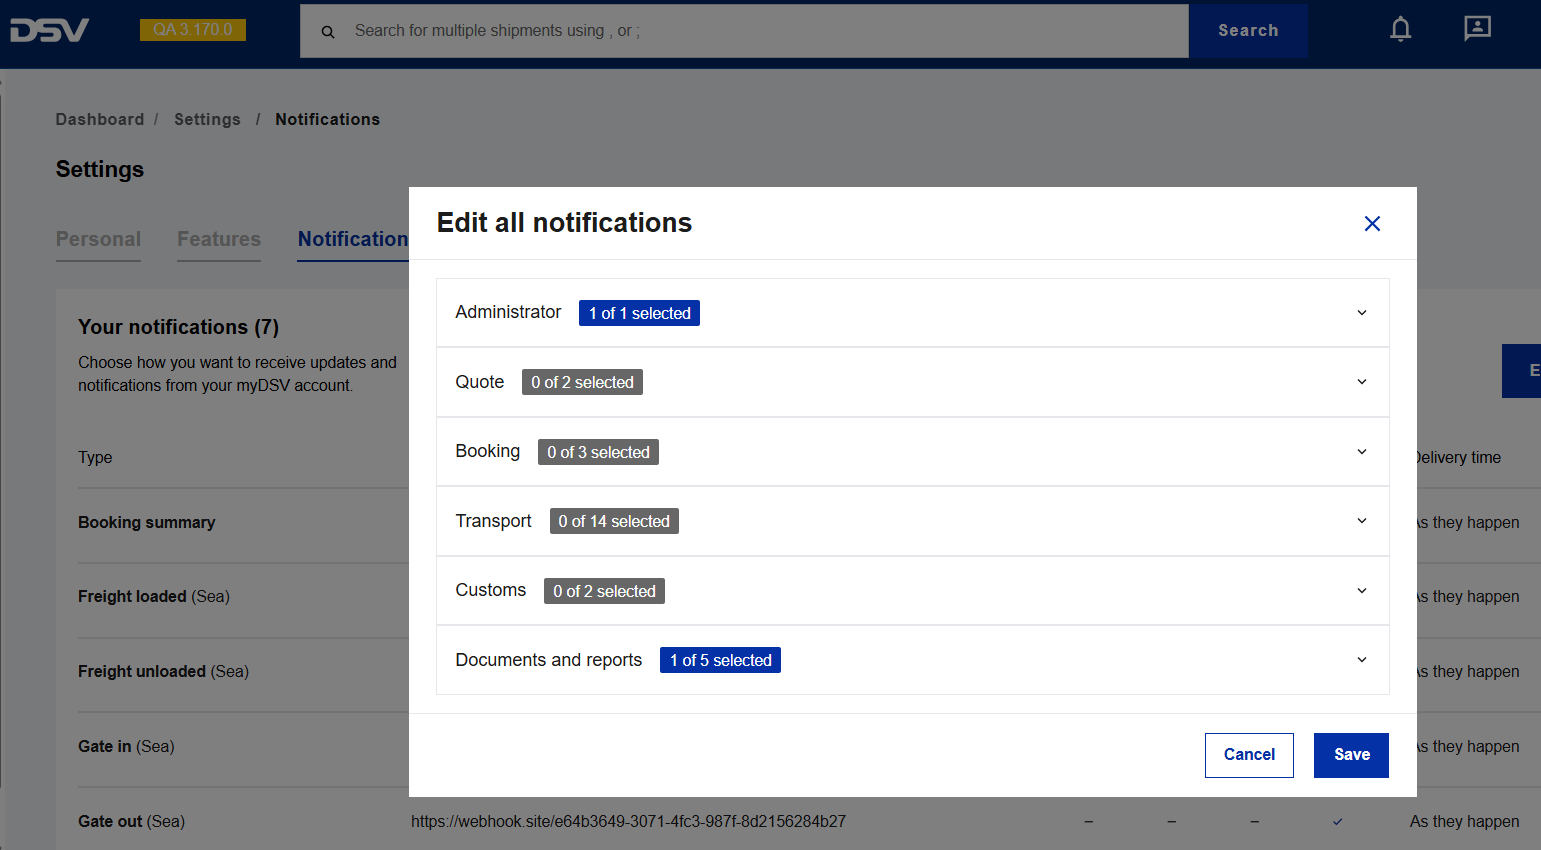
5. Select the category or subsection related to the event or type of notification you wish to receive. Make sure to select the corresponding checkboxes according to the notifications you want to enable.
6. Select the subscription you want to receive notifications for via the webhook by toggling the on / off button and click edit notification.
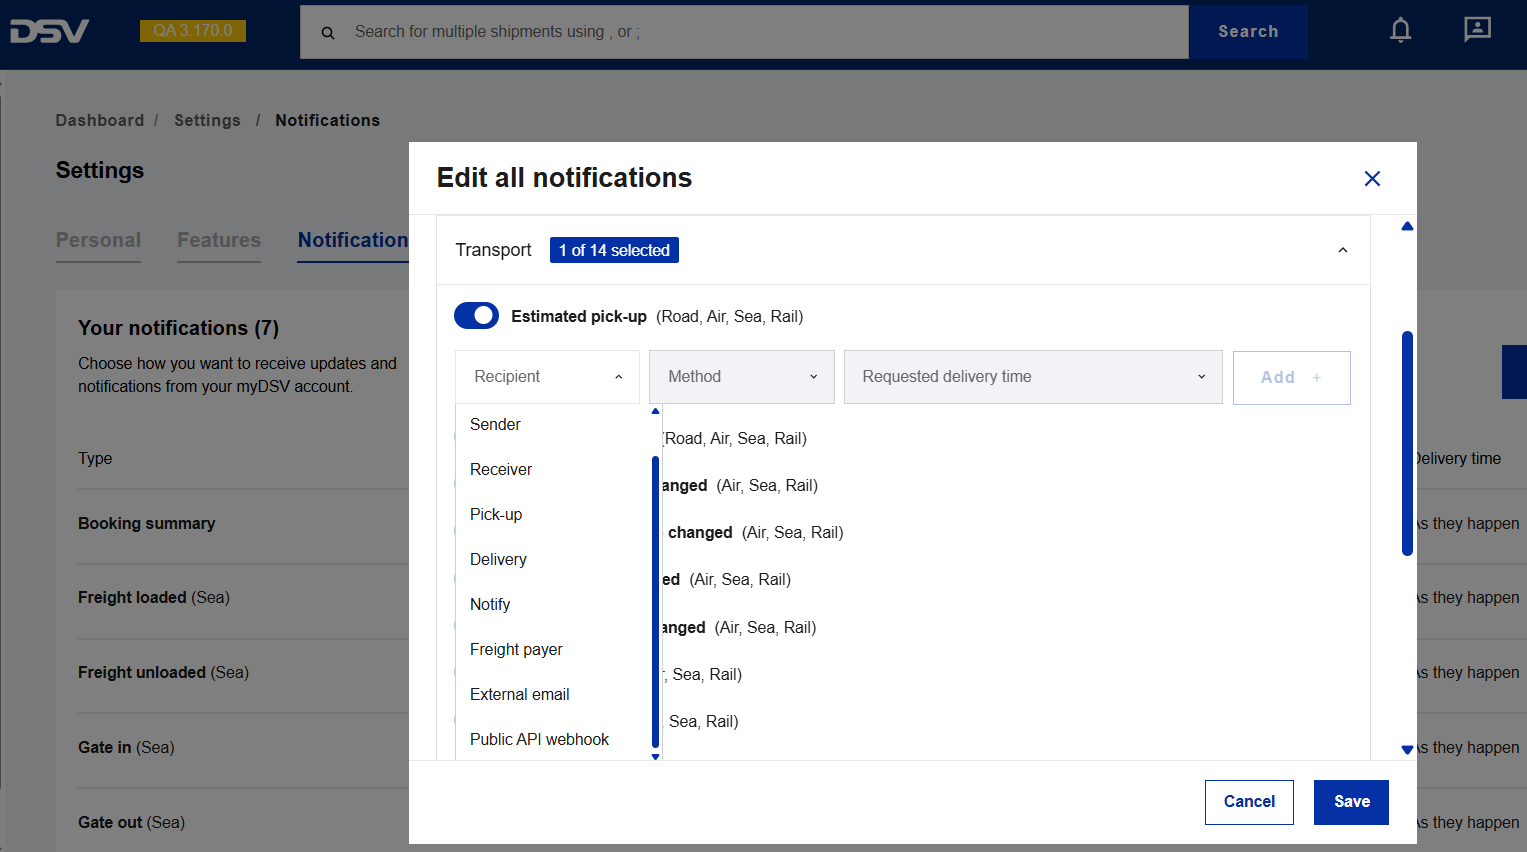
7. Select “Public API Webhook” within Recipient field
a. This option is only available if granted by developer.support@dsv.com
8. Add your endpoint in the field next to “Public API Webhook” and click add
a. myDSV will validate that your provided endpoint is a valid URL.
9. The endpoint is now configured for the given notification.
10. Click Save at the bottom of the window.
Webhook notifications are always sent as the event happens.
It is also possible to setup the Webhook on a shipment level.
This is done with the following steps:
1. Login at myDSV with your API credentials.
2. Open the shipment you want to add Webhook to.
3. Click on the bell (see below).
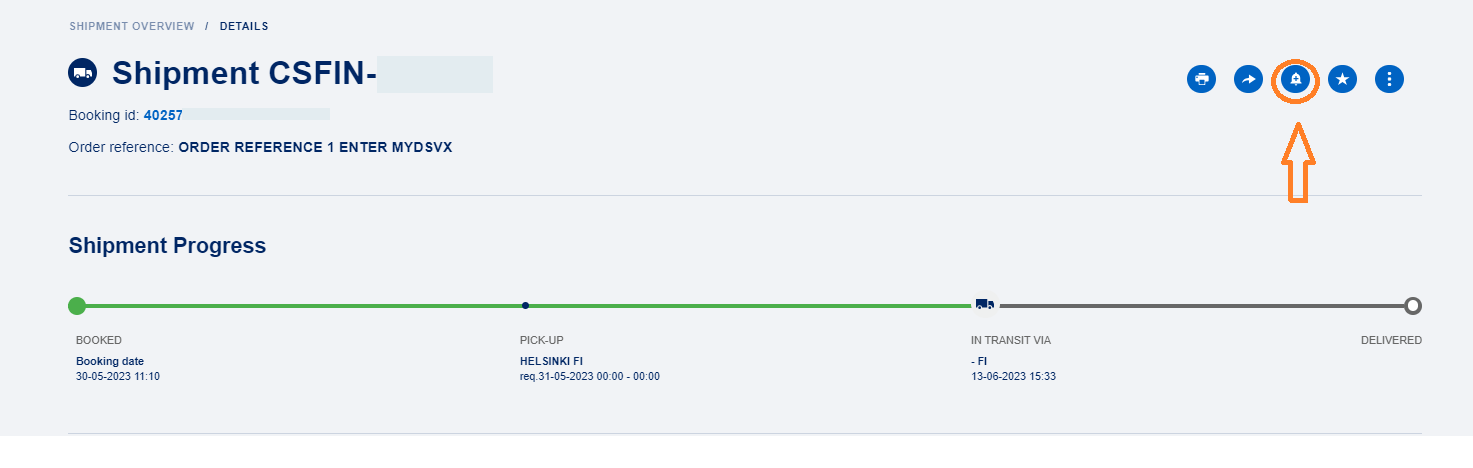
4. Select the subscription you want to receive notifications for via the webhook by toggling the on / off button and click “edit notification”.

5. Select “Public API Webhook” within Recipient field.
a. This option is only available if granted by developer.support@dsv.com
6. Add your endpoint in the field next to “Public API Webhook” and click add.
a. myDSV will validate that your provided endpoint is a valid URL.
7. The endpoint is now configured for the given notification.
8. Click Save at the bottom of the window.
Webhook notifications are always sent as the event happens.
Notification subscription options
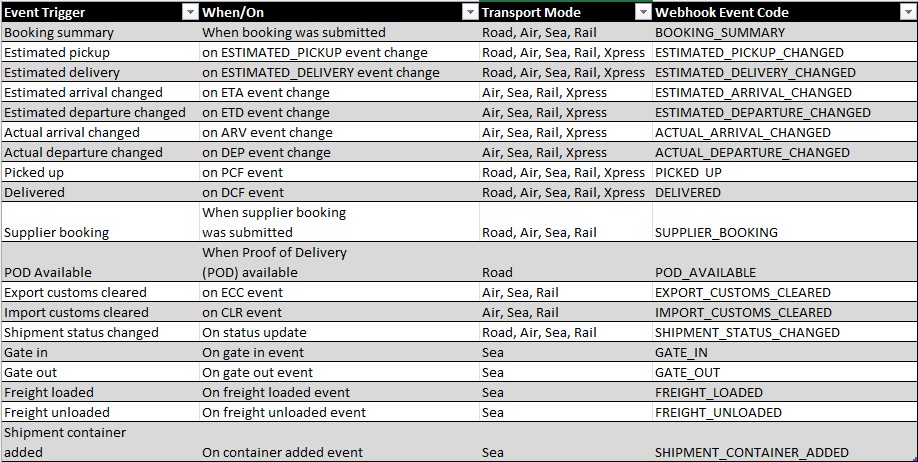
For an explanation of how events are triggered, please see the example below:
For “estimated” notifications:
For Air, Sea, and Rail, notifications are sent when an existing estimated date is updated. In other words, a date was already set and has subsequently been changed.
For Road, notifications are sent even when the estimated date is set for the first time.
Setting up the endpoint
The client setting up the endpoint is free to define how the URL should look according to own requirements. You can accept all the webhooks at one endpoint or setup multiple endpoint (one for each event).
Recommendations:
Use HTTPS for data transmission.
Add a security token to verify that requests originate from DSV.
Whitelist the DSV IP address from which requests are sent.
_________________________________________________________________________________________________
Webhook API Setup
Webhook setup - Generic Invoice
A webhook is a reverse API, that proactively sends the Invoice data to to the designated endpoint.
When you activate the webhook for Invoice you will receive data on all the MDM numbers, which are associated with your API user.
Upon activation of the webhook for Invoice, you will receive data pertaining to all MDM numbers associated with your API user.
Invoice Webhook - Subscribe
POST URL: https://api.dsv.com/my/invoicedemo/v1/invoices/subscribe
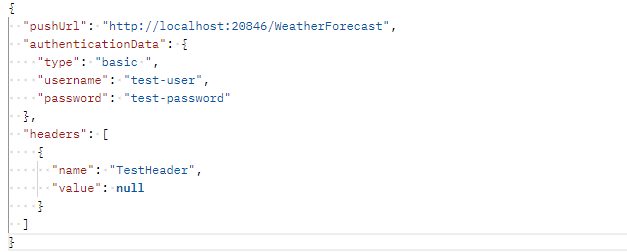
Specify the Push URL: Provided the URL where you want the data to be delivered.
AuthenticationData: We only accept Basic authentication (username and password)
Replace "test-user" with your actual username and "test-password" with your real password.
Headers: Include any necessary headers. Make sure these headers match the requirements of the system receiving the webhook.
Invoice Webhook - Test
After setting up the webhook, test it to ensure it's functioning as expected. After subscribing, an invoice sample will be sent to the defined endpoint.
Invoice Webhook - Unsubscribe
To unsubscribe the invoice webhook, post an API call to the below URL, using your Basic authentication, await response "200 OK".
Invoice: https://api.dsv.com/my/invoicedemo/v1/invoices/unsubscribe
Webhook is now unsubscribed.
Webhook setup - Visibility
URL: https://api.dsv.com/my/visibilitydemo/v1/shipments/subscribe
Visibility Webhook - Subscribe
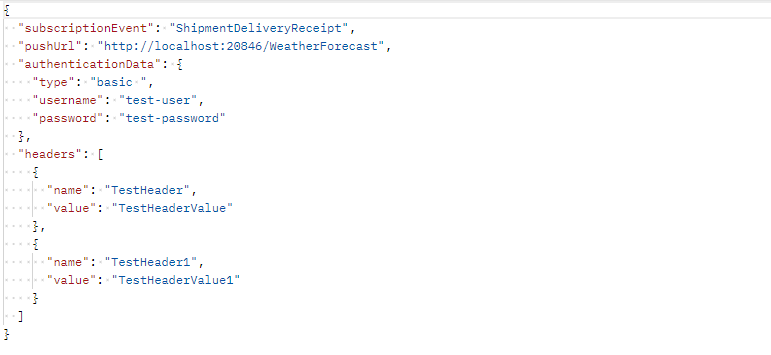
subscriptionEvent
Include the event you want to subscribe to ShipmentDeviceReading or ShipmentDeliveryReceipt. Only subscribe to one event at a time.
Specify the Push URL: Provided the URL where you want the data to be delivered.
AuthenticationData: We only accept Basic authentication (username and password.)
Replace "test-user" with your actual username and "test-password" with your real password.
Headers: Include any necessary headers. Make sure these headers match the requirements of the system receiving the webhook.
Visibility Webhook - Test
After setting up the webhook, test it to ensure it's functioning as expected. Trigger the event that the webhook is subscribed to and verify that the Data is delivered to the specified URL with the correct authentication and headers.
Visibility Webhook - Unsubscribe
Depending on which webhook you want to unsubscribe, post an API call to the below URL. Specify the subscriptionEvent, use your Basic authentication and await response "200 OK".
Webhook is now unsubscribed.
URL: https://api.dsv.com//my/visibilitydemo/v1/shipments/unsubscribe/{subscriptionEvent}